Showing posts with label Hats. Show all posts

Monday, May 20, 2024

Up to my old costuming tricks!!

 People, my new costuming tricks are all about dressing my alter ego. But my old ones were costuming for theatre shows. 

So, recently I've done a tiny bit of costuming. Basically I am a sort of shadowy resource who has tried, and sadly failed, to remain anonymous at a local community theatre. 

My contributions are generally millinery, but a couple times I've busted out something more. Here's a breakdown:

Pride and Prejudice:

This is how it all began. I got wind of a production and offered to insert headgear, as it always gets overlooked but I think it is more important than dresses for setting the scene and tone. (grr, looking at you, Bridgerton)

All of these hats are made from a range of cheap hat types - bowling fedoras, bowlers, molded plastic "top hats" you name it. I now keep a supply on hand just in case. They are useful as they have the crown to brim join already made.

Full bonnets are no good in the Gryphon theatre which has steep lighting lines so they'd cast shadows on faces. So these are all back of head types.

Lady Catherine de Burgh's extravagant tall hat. She was wearing purple and orange so I figured, get in there and lean in on the crazy! It won an award for the best showstopper of the year!

A wee ruched velvet hat, and a shallow bonnet. That was the only straw hat I could find, hence the other solutions I found to the hat making process.

I think this is my favourite. No idea what I based it on! It has a lovely pleated lining though.

Another ruched hat with turban vibes and ostrich feathers.

A little cutie based on a very cheap white top hat. Silk taffeta with organza and fake flowers. It also has a gorgeous pleated lining.

Gabriel

Set in the Channel Islands during WW2 occupation, Gabriel the play needed a period credible brassiere. Trouble is, the wearer would have worn a binder style bra, not the dainty peach and lace ones we love to think of, so I decided stuff it, and built a pretty one on top of a modern skin tone bra.

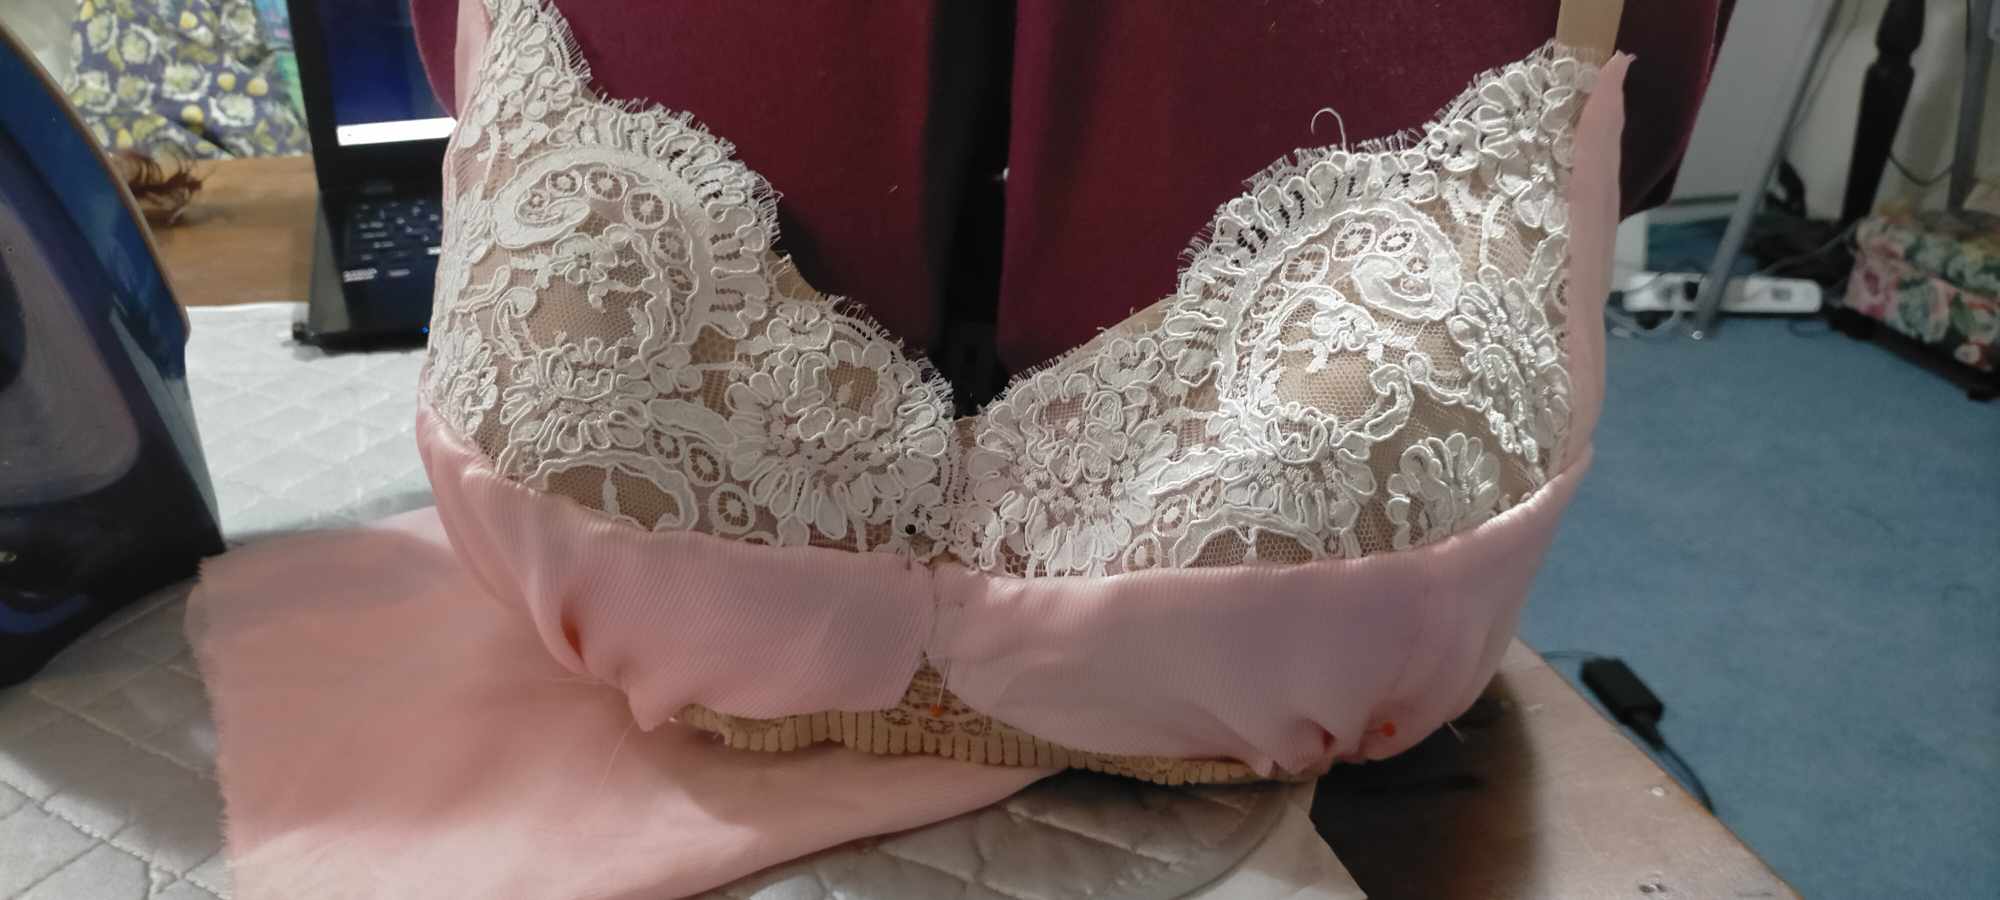
For the 4 seconds it is on display, I think it would have gotten the idea across. Lightweight silk I overdyed with food colouring as it was a bit wishy washy, and chantilly lace from my stash also dyed with food gels.

 Persuasion

Persuasion just closed after a sell out season. A mammoth effort that was costumed from scratch. I was asked to make a bicorne,and  also ended up making a second, not shown.


This is made from a black $12 sombrero - I reduced the crown down, steamed it into shape, covered it in felt using Steamaseam, bound it with black bias then glued on authentic metallic trims. The metallic trim is too heavy for a machine and I knew the stitches would be super obvious from the back row. And no way was I sewing this on through all that nasty synthetic.

So, it turns out my lovely friend Janet was also cast in it and so I undertook to make her overcostume too. She doubled as Lady Russell and Mrs Musgrove. The show wasn't trying to be super authentic, but it definitely captured the vibe, I feel. Sadly my pleas to incorporate shawls and bonnets weren't taken up due to the seamless style of it all, no time for transitions - but I DID get headwear onto my friend.

The only thing I made in this image is the cap Janet is wearing (second from right) but don't you love the puppets for the annoying Musgrove Children! The rest were made by a local lady who is incredibly clever, and had a month to do nothing else. The things people do for community theatre...Anyway cap made from self stripe silk organza and a couple of other laces. The Dreamstress donated some lacy offcuts for this, thank you as always!


Funny, Janet is in the same position in this pic as the last, but this time as Lady Russell. I made her red overdress and turban. The fabrics are velvet and a heavy Indian cotton with metallic crewel embroidery. Everything Janet wore has come back to me and that dress is going to become a jacket at some stage!

And that's my foray into theatre costuming! I did assist with another professional production but I'm not spilling the beans on that one!


Thursday, March 28, 2019

Award Winning MC apparently!!!

Look! I won another thing! I'm so excited because I never win anything, let alone three years in a row. It means a lot to me. And after a week of amazing experiences.

This wee baby is going on my wall soon. ALL the glitter!
So the week before on Thursday 21 March, Leo and I got to MC at the ILGA World Conference dinner. When we walked into the venue and saw how big it was, we had a giggle! 450 delegates, 40 tables of gorgeous humans from all around the world! It was so much fun to get up on stage and look out at them.
Leo and I hosting the ILGA World Conference Dinner

 Me before the show in the shade hence the blue tinge. Prize for best use of a $2 lawn ornament? ;-)
$2 lawn ornament head piece!!!
 This is me with Ross Weistroffer! Who is Ross Weistroffer I hear you ask? (Unless you know him and Googled his name and this came up in which case HI!!!) He is a Research Analyst from UCLA who hunted me down at dinner time to sit and chat because he loves drag queens. What a poppet! I adore gorgeous Gay American men so we're a match! Ross took the photo of Leo and me on stage, bless him.
Ross Weistroffer and me
We had an amazing night with incredible food, dancing, speeches, food, dancing.
Dessert Unicorn!!!
On Saturday 23 March I was up in Auckland, sans lawn ornament, co-hosting the NZ Burlesque Industry Awards with the ravishing Mae de la Rue from Sydney. No photos as hosting an awards is a huge and busy night, so my phone hardly got touched. When the photos come out, I'll post some. It WAS fun!!
Right now I have a rotten cold but I'm dragging myself into work anyway, dosed up on Codral. Trying hard not to cough on people. Don't judge me; it's my second round in three weeks and I don't have time to be sick again!

Sunday, January 15, 2012

Lonely Heart - Martha's Hats

No 1949-1950 setting is complete without hats. Wearing hats, for both men and women, is one of the things that distinguishes the earlier 20th C from the last few decades. If we leave them out of this show then most people would not notice, but they may have a sense of it being "not quite put together" and unfinished.
Ray has a grey fedora that he is rarely going to wear as most shots are interior, but having one in his hands is an important anchor. I just hope that Nick has been rehearsing with it.
Martha has two hats, both made my moi, partly because it is really hard to find hats that old, but also because I love making hats and they don't take all that long to do.

Hat 1: Navy heart shaped hat. This shape was really popular around the time of our play. Whether the brim was heart shaped or round, the effect of a halo rising behind the head was very popular. The crown is made from a commercial hat shape given to me, the brim out of buckram. Whole thing covered in cotton jersey knit (so easy to shape and its dull, thickish texture is reminiscent of felt) and the method an adaptation of my wide brim hat tutorial. The bow is from a scrap of shower curtain nylon I bought at the opshop for 20 cents, as I have no blue in my stash! Trimmed with ivory satin and navy cotton commercial bias bindings.


Hat 2: Red leaf hat. This cloche style hat hugs the back of the head and I love it. I made the base from buckram - cutting a big leaf shape, snipping the long edges and stitching little overlaps all the way around to give it shape. I then covered the outer side with thin cotton quilting batting to soften the shaping lines, then shaped the ruched, bias cut fabric over it. Sew around the edge, trim and sew bias around it to finish it off. The three loops are straight cut fabric with stiff net inside so as to keep their shape.
Small error - the ruching should fan upwards, not downward, but I realised I liked the loops better along the topline not the bottom so it is actually upside down. Such is millinery experimentation.
Thankyou Madame Ornata for modelling. Madame O has been such a great help with this show - coming over for hours to unpick, resew, make me laugh, try things on, make cups of tea, you name it!
Update: it's dress rehearsal this evening which is why it's taken me a few days to get this post completed. And the things I have to tell you about...I don't have time to tell you about! I will very soon, however... :)

Sunday, June 5, 2011

Another Hat tutorial

This hat is very similar in construction to the red hat  I made in February, but I think it has come out as a very different hat and shows how a simple construction technique can be very versatile.
Amy and Rebecca in an excerpt from The Boston Marriage, in Edwardian costumes borrowed from a local amdram and given a quick do-over by moi. I wanted to give Amy a big wide brimmed Edwardian picture hat, but in theatre such hats cast shadows on the face, so I went with the style above instead. I altered Amy's rose madder jacket that had a peter pan collar by folding back the fronts and adding a Karrickmacross antique lace collar I was given. Naturally it came off straight after the show and went back in my stash!
 I used a silk jacquard chosen for its colour match to the suit and also its yumminess. It only took about .6m. Same as the red hat, I used heavy vilene and visofix to stick the fabric to both sides of the brim. Brim is wider at the back, another theatre thing.
 The brim, trimmed.
 I cut a long strip for the crown and played with it until I liked the size and shape. This one is toooo high.
Trimmed down to the right height. This is only about 3 inches deep. a little crown can go a long way. Stitched together with big rough tacking stitches.
I joined some offcuts to make a long, straight cut strip
 Wrapping the strip around the crown, I then slipstitched it in place. Make it fairly taut so it stays in place by itself.
 Next is the lid - a bit of math needed to work out the circumference as it needs so be oval not round. I used the visofix to stick the fabric to the vilene again...
 And then press under the cut edges. One 'lid,' done.

 Rim bound as was the red hat (I didn't take photos this time as I had to sew it on in reverse, this was the beginning of the end of my poor sewing machine!) Also as per red hat, I snipped the brim and folded the tabs up into the crown. Lid is slipstiched to the crown, brim is stitched to crown with tacking (basting stitches) that catch the tabs, then sewn again by hand for strength. For a project with a longer shelf life I would now line the brim to hide all the workings but not worth it for this.
 The untrimmed hat. As you can see it is a bit 'literal' - all straight ups and downs. This is why the next bit is so important to give it character.
I cut a wide strip on the bias longer than the crown and pinned a folded edge of it to the bottom of the crown as shown. Looks a bit odd!
Working around, I then pinned the other folded edge to the top edge of the crown.
Fiddling around with it I got soft ruching underway, pinning them into place the sewing them down, by hand of course, roughly, down the back. This is a fiddly job but a good DVD and good company made it fun!
 Drawing the loose end across, I folded it under, ruched it up and overcast it also. The top and bottom edges of this added fabric I tacked into place with big stitches. nothing needs fine stitching, in fact it doesn't really work.
To hide the stitching and to spruce it up, I added a flourish of lace. I was only using what I had - with more time and budget it would have got flowers as well!
So there you go. One hat, passably Edwardian. What else is possible from a simple straight up and down brimmed fabric hat? :)

Thursday, March 3, 2011

Hat trick - making a wide brim hat - Tutorial

Robbie's wedding was on the beach and so I needed a hat. I wanted a hat that would pass as a sunhat but with a touch of formality. The results were so fab I just had to share them with you. It is SO easy to make a hat this way.

Me in my hat trying to take a photo. Not easy!

I think this hat looks very early 20th C. A few adjustments and it could be Edwardian, Georgian - all kinds of eras really. It's just about fabric and trim choices.
You need:
  • A nice fabric that can take pressing - preferably a natural fibre. I used fine shot linen, about 3/4 yard.
  • A fabric for fussy cutting the decorations. At least a fat quarter's worth.
  • Very heavy vilene, about 1/2 yard, and a piece of lighter iron on vilene or other interfacing.
  • Steam a seam - about 3/4 yard (visafix is not as good for this as it doesn't stay tacky)
  • Matching threads, I used a variegated one
I made the crown before deciding to photograph the construction so can't show it. All I did was to cut the crown top and the long strip that is the 'rise' of it out of the light vilene, and the crown and a strip of bias three times the depth of the rise out of the linen. I ran big tacks at intervals up the bias strip and gently laid it onto the ironon side of the vilene in big horizontal soft pleats by pulling up the tacks. I then gently pressed the whole thing, so the ironon caught the pleats into place. Remove tacking, seam the back and sew to the crown. Easy! hehehe (yes i know, I am sorry! It's easier than it sounds!)
 (Ignore the pinked edges, I was using a pinking blade on my cutter but a straight one would make more sense.) I cut the brim from the heavy vilene and two from the linen, at least a 1/2 inch bigger all round. I used the steam a seam to convert the vilene into double sided ironon,
 and sandwiched it in between the two linen pieces. I pressed it all until the vilene was well and truly bonded. Trim the excess linen to be flush with the vilene underneath.
 Make a 2" wide bias strip of the fabric long enough to go around the whole brim, press in half longways, and sew both raw edges to the brim's edge with a scant 1/4" seam.
 Now fold the strip up over the raw edges and sew it in place, making a neatly bound edge.
 Now the decorations. I found lots of big flowery prints in my stash I could have used, and in the end I settled for the one on the far right.
 The flowers are in rings already, so it's easy to see the potential. I roughly cut out several of the big roses and turned them into transfers with the steam a seam.
 Here are the roses cut roughly. Once I knew how I wanted them, I trimmed the shapes neatly,
 ...and pressed them into position.
 Using my free motion embroidery foot with the dog feed dropped, I 'drew' around each rose with the variegated thread, making sure the sewing was attractive as it shows on the other side of the brim also.
 I sewed the brim to the crown and didn't even bother to sew tape over the seam, but it looks great anyway. See how the big soft foldy pleats around the crown give it an extra dimension, and they hide a multitude of sins too!
A bit of ribbon to adjust the open back and we're done.
This would have worked with a continuous brim hat also. The reason I made the bonnet style back is because I tend to twist my hair up and the resulting lump is hard to accommodate under a hat. This style of back accommodates the lump-(in fact that's probably why such hats and bonnets were in fashion whenever buns were). The only difference really is that before sewing the centre back seam of the crown, I trimmed a curved section off each side and bound it with bias. Then I just ran the seam down.
Happy hat trick!