Showing posts with label Techniques and Tutes. Show all posts

Saturday, September 1, 2018

How to Rhinestone

This is the costume I've been working on forever. Today I started the back of the skirt
I refer to rhinestoning as just stoning, and given the need to heat things in spoons on elements and little plastic baggies, frankly the whole set up is a bit Stoner!

This is how I do it. It works really, really well, does not involve toxic glues and doesn't take very long. I took photos as I went, hopefully these will illuminate the process!
You need:
My menu of rhinestones - AB Rosaline and AB Rose, AB Peridot, Peridot and Emerald. These wee baggies are worth nearly as much as I imagine they would be if they contained an illicit substance ;-) These are from www.rhinestonz.co.nz
  • Something to Rhinestone (my robe as shown above)
  • Flatback rhinestones - I use Arabesques because I am a cheapskate - they are fifth of the price of Swarovskis and not quite as good, but on this costume it's all about the quantity. 
  • Beeswax
  • A wooden skewer
  • A teaspoon with a heatproof handle
  • Aleene's Tacky Glue - it is by far the best glue as it holds its shape really well and dries fast. For stretch fabrics or things you will need to wash, use Aleene's Flexible and Stretchable, which isn't quite as thick but holds a blob well.
  • Silicone baking paper - pretty much essential for thin fabrics or areas like sleeves where you have to have one layer of a costume over the other.
  • PATIENCE
 To make an applicator stick, first cut a sliver off a block of beeswax. Pop this into the bowl of the teaspoon and put on an element to soften/melt.
 You only need a little bit of beeswax for this - you can use the rest for sniffing!
 When it is soft enough to mash up with the end of the skewer, gather up some and form a  knob of it on the skewer end. Let it get a bit firmer before using.
 I am starting with the dark green stones. I tip enough to do the job onto a lid, so I can move them around easily while working.
 While my beeswax is cooling, I turned all of the stones up this way.
I spread the gown on the kitchen bench return, over a layer of the silicon paper.
 Now squeeze out wee blobs of the glue where you want the stones to go. With these deep green stones, I am working on the darkest branches of foliage in the pattern.
See how many blobs I can do in advance! You can do more than this too. The glue stays wet for plenty of time, though I wouldn't wander off halfway through to take a long phone call. I use the wax stick to gently catch the top of a rhinestone and transfer it to a blob of glue. Gently press it in.
  This is the whole branch completed. See all that white glue showing? It's a good thing! It dries clear but the ring of glue means the stone is held well in place.
This shows the second round of stoning - once I completed the first branch (top of pic) I then glued up two more.
Here's the finished area after I've gone over it again with the other colours of stones. Because this is the back, I've been pretty light-handed - the fronts have about three times as many stones. But I have found the hard way that backs of costumes get a hard time with sitting etc, so this is just about it not being obviously not done!

Top tips:
  • Your beeswax applicator my get less effective if it is cold.  I use my fingers to soften it back up again. Remember you need only the lightest pressure to lift the stone and transfer. It should release, really easily as a result.
  •  Aleene's dries enough to peel the fabric off the paper in about an hour. Gently peel it off - it will be stuck but it will still lift. It is not dry enough to wear until at least the next day but preferably a good week of curing is best. But with a huge job like this neverending robe, I need to shift the completed stuff so I can do the next section
  • Of course you can follow a pattern - I do this too but it is far easier to follow the pattern of a piece of lace, a print or a brocade design. Same principles apply.
  • If you can't find non-hot fix in your colour, get the hot fix ones and stick them on this way. It's no biggie.
  • ALWAYS stretch out garments that are worn stretched, before you do them. 
  • ALWAYS use a thick, tacky glue like Aleenes - if you are working on a foam cup bra or some other surface that is not flat, it won't dribble down the slope like GemTac or Tiger Grip. Not all PVA based glues are the same!
Good luck and let me know how it goes!


Tuesday, December 26, 2017

More sewing!

Holiday projects! We lovez them! For years I have had it in my mind to embellish a denim jacket with one of my beloved Virgin Mary panels. The trouble was, I needed to find, or make, a denim jacket. Making one has never appealed to me, and it was only this month that I found one I love at City Chic (ahem).
I love that it comes to the natural waist and is just a really good, classic shape.

I "auditioned" the various colour and style combos for VM panels and this one won:
Because RED, and an interesting shape, kind of like a ginger jar.
I pressed some Steam-a-Seam onto the back and cut it out like this:
Shown cut out through all layers, the back (this is an old piece of SaS, before the grid markings we get now) and the back after the backing was peeled off.
Just to be sure I didn't put it on crooked, I put a pin at the half way point of the back panel top and bottom, and lined up the cut out panel with them. Then I pressed it into place. Weird photo of me pressing as I am left handed!
See why I called it a ginger jar? 
Never one to stop at a single thing, I decided to add some embroidered motifs, These roses had no iron on back and though the plan was to machine embroider them on, I did want them SaS'ed first so they wouldn't shift about.
 So I had a play; first I finger pressed pressed the rose onto a piece of SaS, then roughly trimmed off the excess paper. Then using the big piece of backing peeled off the main motif as a pressing cloth, I pressed it so I could peel off the backing. The result is bottom left. The back is bottom right, showing how cleverly I left the price sticker on it! You can see a bit of a web of glue left over. Not good. I trimmed this out before pressing it onto the jacket, again using the backing paper as a pressing cloth.
The rose pressed into position - a little bit of glue residue but it will fall off or wash out or whatever!
Still being determined to make this easier, I tried a different tactic. 
I got all the way to the point where I have just hot pressed the SaS onto the rose and peeled off the backing paper, but to get rid of the residue, I laid it onto a scrap of fabric, right side down (so opposite to if I was attaching it) laid the backing paper over it and pressed it. What this did was to melt the residual glue onto the scrap, while leaving the rest on the rose. It was a teeny bit mozzarellaish peeling it off but it was fairly easy.
Hard to see but it has less residue to trim off. 
 Rose two positioned. And now, onto the Birds! I grabbed a symmetrical pair of these gorgeous birds from the shop. They already had an iron on back which was pretty useless but really it is only to hold them in place for a wee while.
Here we are so far. I've machine embroidered this all with variegated thread. I am IN LOVE.
And now, rhinestones.
More is more, right? ;-)

Saturday, June 8, 2013

A Fitting Lecture Part 1

It's been a week since my first lecture at HandMade, and I've finally caught up with all the work that got behind the week before (mammoth haberdashery order placed today, it read like a telephone book!) so I can start putting some posts together.
It turns out, one can communicate an impressive amount of information in an hour. I was really surprised. I thought I would run out of time, especially as I tend to go off on tangents, but it was all fine.

So, here is a rundown on the first part.

 Normal vs Average

Almost noone fits patterns out of the envelope. If you do, I am genuinely thrilled for you. But it is rare. When I run an average on the daily take divided by the number of sales, the figure I get is rarely the same as a single individual sale. It's the same for patterns. They try to be average. This is NOT the same as normal. Normal implies that if you don't fit the pattern, you are not normal. But, it just means that you are not average. That has to be a good thing, surely!?!
So, your rounded shoulders or sway back or long waist are normal, because normal people have these things; or some combination of the many figure variations comprising a human body.
Are you with me so far? Good. So, step one - STOP JUDGING YOUR BODY. Because, while you are beating up on your big bust or curvy thighs or narrow shoulders, you are unable to learn anything useful about how to dress them. FACT.
Get to know the body you have, the way it is and the way it isn't. You don't have to love it or loathe it, just accept it and learn it and you will be just fine. And if it changes, learn the changes.
So, that establishes Fitting Ground Zero for me.

Zen and the limitations of language

Language is an interesting thing. I learned to fit by drawing on my dolls when I was a child, learning how the sections I made could be rendered in fabric. Eventually I started experimenting with my own clothes, and by 15 I had extended this to costumes. Noone ever asked what I was doing or how or why so I never needed any words. Until about four years ago, I was never called on to explain much at all about what I was doing. Then I discovered sewing blogs, and a world where people talked about and wrote about sewing. Wow, all these new terms! FBA, SBA, so many adjustment terms for patterns I had never heard of. Yes, I knew how to cut a muslin or tweak a pattern to fit a woman with minimal measurements, but I couldn't explain how or why I knew it. I've been working to wrap words around what I do, and the lecture was a part of that journey, but even now I often resort to those 'technical terms' like " thingamewhatsit" all too often!

After a time feeling like a fool for not knowing even the simplest terms, it dawned on me that what I knew was more than valid. On Project Runway, the designers applied tape to their dressforms like I drew on my dolls, to understand how the construction lines are rendered into fabric pieces. I was a draper, and I didn't even know it. But having said that, there is a bunch of technical stuff around draping that I may or may not know, but what I do know is I know quite enough to more than get by, and so can you.
I want you to forget everything you have learned from tutorials about doing FBAs or any other technical pattern adjustment, and roll with me for a bit. Because, a little knowledge can be a dangerous thing, and my observation of pattern adjustments such as FBAs is that they can fry your brain, cause excessive chocolate consumption, and there is no substitute for learning by getting hands on with your good self.

source Just how long do you think a Shaolin monk spends on the internet trying to learn how to do that stuff?

I know, you're thinking, well MrsC as you call yourself, that's all very well for you to say with your doll drawing and 35 years mucking about with fitting, but I am just trying to find out what to do, all right? And would you pleas stop ranting and putting up random pictures you googled and get to the freaking point???
To which I say, because I can, that I am going to leave you in suspense until the next post. Partly because I have drunk a glass of wine and it may all go Bad, partly because MrC watching the France/NZ rugby test in the same room is causing me to want to go to bed (sorry, I loathe televised sport, it makes as much sense to me as porn - i.e. doing it yourself is one thing, but watching other people do it is just weird) but mostly because my presentation is in my office and I need it to get to the actual point.
So, until tomorrow when I will return with, hopefully, some actual content! MWAH MWAH!
Best  MWAH MWAH pic of me ever!


Monday, May 27, 2013

A Fitting Post

Readers, I am in the midst of planning my lecture this weekend at HandMade on Getting a Great Fit. It's a fascinating process.

The Patterns
I am using two patterns from two different companies, chosen because they are generic enough to use as a sloper for adjusting other patterns.
2648
This pattern Simplicity 2648 is an Amazing Fit style which means it has different pattern pieces for different cup sizes, and different skirt shapes. Personally, one glance at it told me it was not amazing at all, but that’s to be expected and we’ll look at what you can do to make it amazing after all.
B4443 
Butterick B4443 is a great basic dress pattern. Unfortunately without a sleeve option. 
 
What these patterns have in common - princess seams. I love me a bodice with princess seams. No cut gets a better fit. In today's world where we don't mess around with body shapers and girdles and corsets, our torsos are not rock hard, reliable, smooth plinths on which to mould a bodice, like they were up until the 1970's. So, a princess seam allows you to follow the contours of the real body underneath.
This morning we had fitting number 2 for the B4443, and it went like a dream. I am still working on how best to present the process in such a short time, Probably photos of the various bodice pieces side my side to show their development through the fittings. These I will post here when they are done and the lecture is done. :)
Simplicity 2648 is yet to have its second fitting. The first one turned up a lot of alterations needed, which is what I expected.
Come Monday, I promise to share my results with you all. :)

Monday, January 14, 2013

Tutorial: Matching a pattern for a pocket

Dear ones, The Shirt is coming along nicely. I matched the rather wild pattern on the patch pockets and thought it might be useful to others to know how I do it. My method, which I first used 33 years ago to make a leopard print shirt for a friend, is super easy and quick and it works!
Matching patterns on a busy fabric is not just a showoffy thing to do, it also stops the garment from being cluttered and busy in a bad way.

1. Separate the two shirt fronts and pin the pattern tissue back onto one of them, with the fabric right side facing the tissue. In the photos, the pattern is upside down-whereas for the other side it would be right side up.
2. Now pin the pocket pattern piece over the pattern, matching the markings. In this case, I've matched the inner edge only because of the folded adjustment, but if you can, match all the placement lines.
3. Now using a chalk pencil (because it rubs out), carefully trace over a few key reference points in the fabric pattern. Not all of them, just a few. I'm using a purple chalk and you may be able to make out that I've traced a leaf and a flower just above where my hand is in this photo.
4. Now unpin everything. Place your pocket piece onto the remaining fabric and carefully line up your chalk marks with the pattern. It takes a teency bit of patience but not too much :) It's hard to see in the photo, but this stage is simpler because you only have one layer of tissue to see through. Cut your pocket out.
5. Rub the chalk marks off the pattern piece (I brushed them off with a dry microfibre cloth) and repeat the whole process for the other side of the garment.
This is my piped pocket all lined up on the shirt front ready to sew. You don't even have to match the placement lines - use the pattern matching to place them, it ought to be just right. This works just as well without piping, of course.
I thought about it but in the end decided I wasn't going to match the patterns on the pocket tabs - instead I cut them on the bias. But I wouldn't have not matched the pockets themselves as with the pockets and tabs unmatched, it would have churned up the front too much.
So, I hope that was useful for anyone who has ever wondered how to do the matching thang.
If your pattern is too faint to see through the two layers of tissue, you can trace your pattern onto the front pattern piece in something a little easier to see, then put the pocket piece over it and trace THOSE lines instead. But hey, I'd only do that if I really had to :)
This pattern is a one size 42, and the hubster is really a 40 at most, maybe even a 38. Thus, I have folded out a little width in the collar, collar stay, fronts, yokes and backs to reduce the width. It's an easy enough adjustment to make, but unlikely to work for dramatic decrease in size. And I've left the folds pinned as the peacocks are yet to come, and I just ordered ANOTHER fabric for him. I just hope I don't run out of this creative productivity phase before I get them all finished! :)
UPDATE: Turns out the excessive ease of modern patterns did not happen in 1980! The shirt fits but only just. So, I'm going to have to rethink the adjustments for the next one!


Thursday, December 13, 2012

Christmas Segment 2 starring my Second Burda 7396 make!

Christmas Crackers and a quick look at napkin ring finishes. I finished this version of Burda 7396 at a quilting retreat in the first weekend of December. No time for quilting, me! :) I love it sooo much. It is a heavy cotton with 5% spandex. Normally a fan of more dramatic colour schemes, I still fell hard for this neutral water colour rose pattern. A touch of pintucked linen for collar and tabs.
Unfortunately it was the only make from that weekend to work first time. The other need fixing. I hope to post about them soon. Tooroo!

Wednesday, December 12, 2012

Christmas episode 1

Helloo again! This is our second segment. the husband tells me I do too many take offs of kiwi accent in this one. Not sure why. Nerves? Anyhoo, here it is.


A word about our Samantha. She is such a honeypie! We get on like a house on fire and she is so supportive, keeping an eye on me and making sure the action keeps going. I love working with her and I so appreciate her asking me to come and do this.
Two more to go before Christmas. All to do with making a great table setting for Christmas Dinner. :)

Sunday, March 18, 2012

On cameras and Pants/Trouser blocks

Seems to be a rash of camera failures in blogland. Mine keeps doing a dying swan, and even with new and v expensive battery, it's not holding a charge. So, I have several posts waiting for photos and not happening.
In the meantime, I am very excited by StephC's new pants block service.
Pants means trousers, of course! Getting trousers to fit properly is a challenge for many sewists, and finding ready mades that fit is next to impossible for many.
Steph has a gift for understanding pattern drafting and being able to communicate the distinctions of it that has me in awe. If you struggle with trousers, pants, breeks, strides, slacks or whatever you call them, I suggest you check out her service, over on 3 hours past.

Friday, February 10, 2012

Finished Project - Embellished Anne Harvey Jacket

While I was in the UK last year, I discovered Anne Harvey. What a fabulous shop! the standard, variety and fit of clothes was so much more than we get ready made in New Zealand and the prices were pretty reasonable too.
I found a linen neru jacket, unlined,that fitted me like a dream, and I really wanted to get it, but I am just not a natural/porridgey coloured jacket kind of gal. Tired of black, yes, but not ready for neutrals. But then I thought, hey, this is a blank canvas garment. Its unlined construction means that embellishing it will be a doddle.
And so a few months after we got back, I embellished it. And here is the finished object:
I used the same fabric as for the wide brim hat, and a similar technique for the applique. I also changed the buttons.
I adore these painterly roses so much!
Close up of the front. I didn't want it to be symmetrical but I did want it to look balanced. I think we got there in the end!
Super close up. This has been washed and the roses are fraying a little, which is what I wanted. I made sure the steam a seam didn't go to the absolute edges, so the raw edges of the fabric would start to fray. The leaves are a soft gold net - double layered since one wasn't enough, and machine embroidered only along the veinlines. They flop a bit but I love the effect.

The inside shows the stitching on the rose. Because it is big, and pretty, I've drawn over it quite a bit with the machine, so to speak, in a variegated thread. This is more visible in the live item than in the photos 
So there it is, looks a treat with my red linen skirt and a white top.  

Monday, August 29, 2011

Red to black -jamming a quilt

Last weekend I failed to go on a quilting shop hop, and so I decided to dedicate most of my weekend to making a quilt. I really wanted to do something creative and not entirely preordained, but this is really tricky in quilt making, which is ultimately an exercise in repetitive geometry, and accuracy is important.
I realised that I simply HAD to overcome the limitations of this in order to satisfy my need to "jam" with my stash. Jamming in the musical sense, where one uses only techniques and experience to make things up as you go along. This and the need to make a throw for the couch, and use up some of that darn trophy wife quilting stash.
So, I auditioned a range of fabrics from reds to black,(second and third shelves) with a warmly brown and olive oriented back story, and cut some strips off each, ranging in width from 1 inch to 2.5 inches.
 The line up. A few more got subbed in at the last minute too
I arranged them into groups that would equal about 10 inches wide when sewn together, from the lightest red to the darkest dark. When the first one was sewn up and pressed, I finally thought, hmm, what to do with you now?  
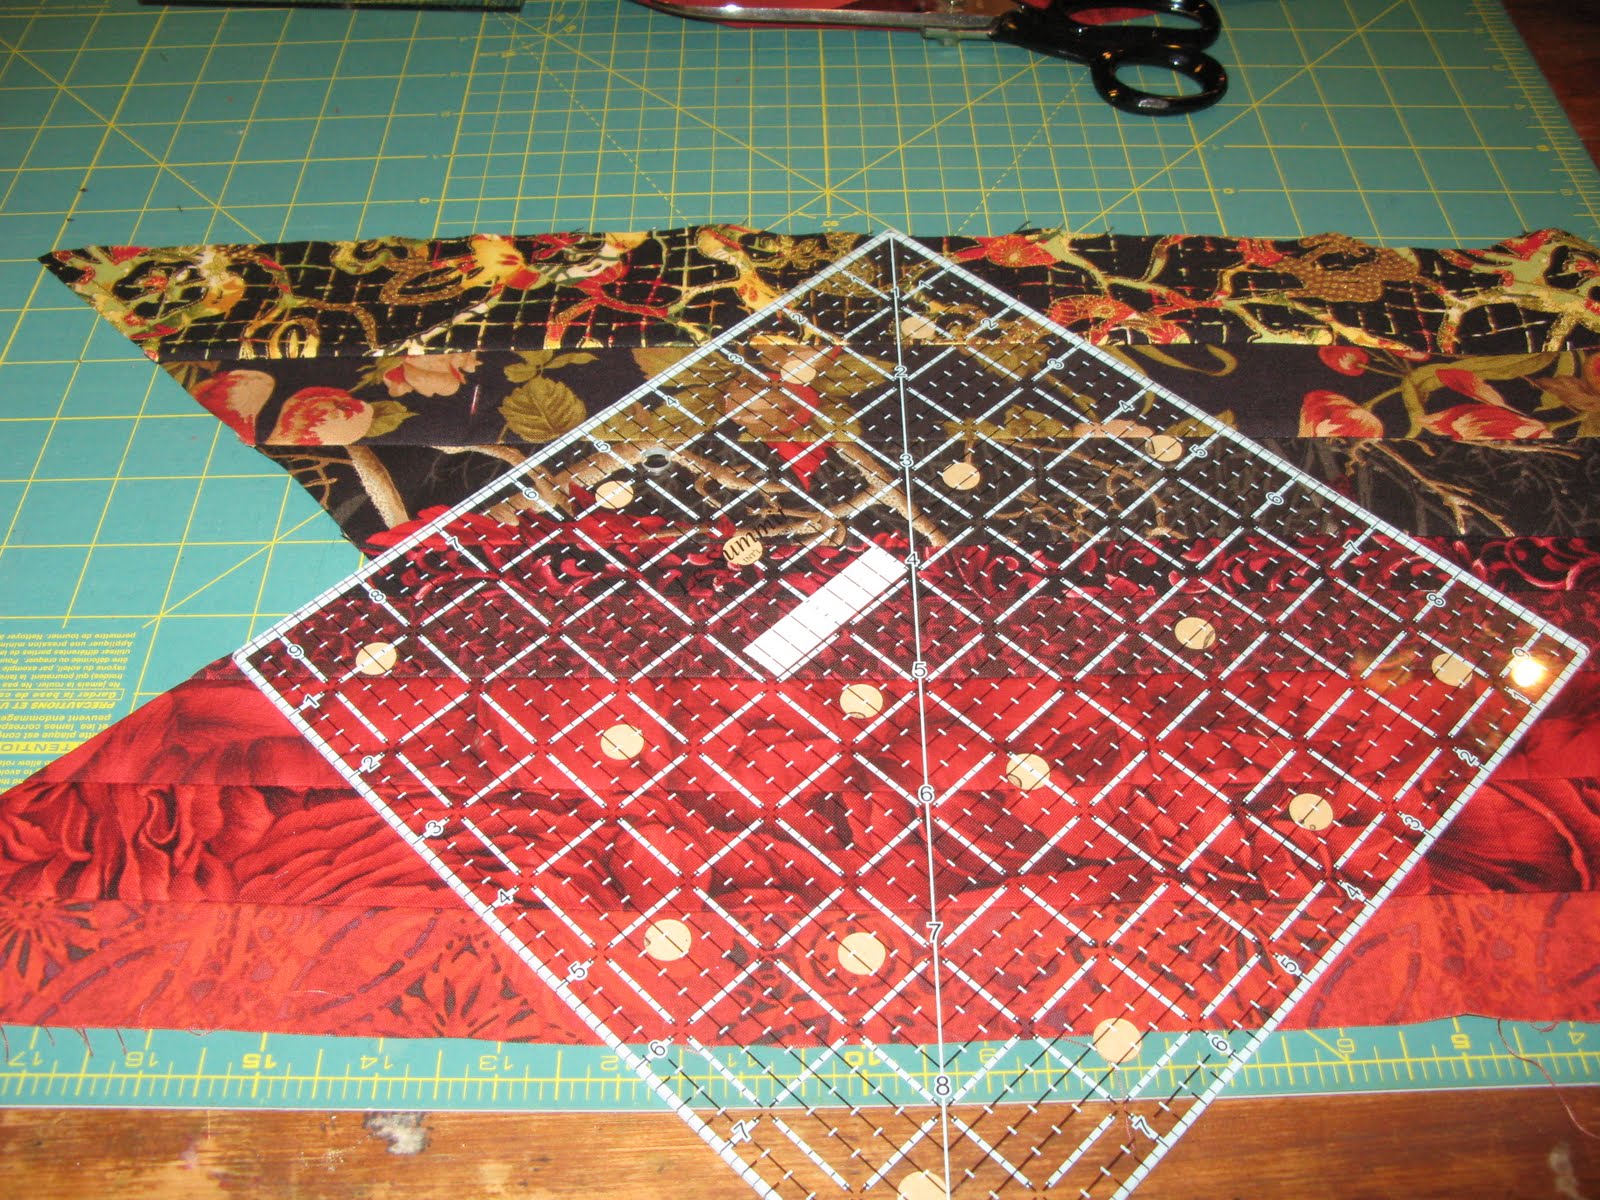
 So, I cut it into four "on point blocks", 7.5 inches across, which was the biggest I could make.
 Cutting the top...
 Reversing the ruler and cutting the bottom... 
The resulting blocks. Squee, so pretty!
This left a bunch of half square triangles, either all red or all dark. What to do with you lot, I thought to myself. I know, I'll add a triangle plus a bit to each one of a whole print from the range of fabrics used. Done.

 Darks with darks
 reds with reds
Repeat four more times. Result is an amazing effect of movement, nothing like I could have planned. I love how the reds seem to bleed through - not yukky blood bleeding but paint on wet paper bleeding. The darks create points that intervene almost like mountains in a Japanese landscape. Phew! Who knew! LOL!
The blocks so far.
I WAS going to sash the whole thing with a 3/4 inch wide sash in the same almost black sprig I used on the edge bits of the colourwash quilt. (Which I just realised I never blogged about as a finished quilt and must do so as it is gorgeous!) but because I had used it on that project, I now don't have enough. And I cannot find anything like it. So it may come together without sashing.
More jamming.
More later...

Tuesday, August 23, 2011

Petticoat update - Savant sewing

Remember Joy and I promised to make a white rockabilly petticoat even bigger than the black one? Well on Sunday we started.
This is what I call idiot savant sewing. I know what I am doing but I don't know why I know and I find it hard to articulate. I think it is more idiot, Joy thinks it is more savant, but she is very generous hearted. And patient with all my "I don't know!" answers to her perfectly sensible questions!
Using tricot instead of tulle meant adjusting the allowances an amazing amount - that stuff gathers up like nobody's business compared to tulle. We're getting through 50% more fabric for the same metrage, but it is VERY poofy, so hoorah for tricot! Cheap, and nothing to rip your tights on!
So far all we've made are the ruffles and as these are the same as for the black one, we didn't bother to photograph it. We'll start snapping at the next stage. It was going to be one uber petticoat, but is now to be two, allowing for adjustable froofelage (the official measure of the stickyoutiness of a petticoat). The finished two petticoat effect will be 2 bazillion units of froofelage. :)

Thursday, July 21, 2011

Why Rockabilly petticoats need to be a half circle.

This is a little bit of a random thought, but as I have started down the road to full petticoat "last word" ness, it has its place. :)
Joy asked me the other day if we should make the white version of the full petticoat as described in this tutorial as a full circle and not a half. After all, these petts go under full circle skirts.
There are several technical reasons why, and also why we don't gather the petticoat heavily at the waist either.
If you look at the way a full circle skirt falls, part of its charm is all of the folds that gracefully fall along its length.
See all those lovely rippling folds at the hemline? They are GOOD! And they look so lovely sitting out on the support of a full pett.
Now imagine if all those folds had frills sewn to them. The frills would also fold in and out and in and out, and these folds would be all ridgy and uneven. Lovely on the skirt, but lumpy when underneath.
So, a half circle, slightly gathered at the waist, is ideal. It will give you a nice cone of fullness to support your skirt. Too much gathering at the waist and we're back to the folds problem again.
Now FULL, gathered skirts, they are a different story, and one I am not telling here :)
Full gathered skirts have slightly different petticoat rules. :)

Sunday, June 19, 2011

Making a full petticoat the EASY way - tutorial

Darling bloggettes, I just farewelled my lovely friends Joy and Madame O who have been at mine this afternoon. Joy and I making her a rockabilly petticoat, while Madame O did embroidery, and tried things on. (I have a dress up rack, it is quite fun!)
Anyway, I've been trying to get Joy to make a petticoat for ages but it was daunting her something chronic; she had visions of being buried under metres of tulle frills. So, I thought, we need to find a way to do this that doesn't require pulling up gathers, quarter marking or generally, well, being buried under metres of tulle frills!
So, this is what we did. You could make it a lot fuller by repeating the whole thing and having twice as many layers. We may yet to it. We only used 3m of a kind of netting that is not tulle and not stretch net, but something fab in between. Tricot would be a good substitute,or bridal tulle.
I cut a half circle of the net, 15 inches long, with the top being 14 inches in radius. That is a circle with a total 29 inch radius. Sorry no photo but it is easy to see further on. This gives about 40 inches of waist, heaps to gather onto a foundation skirt.
Cutting 2 x 16 inch wide strips along the length of the fabric. It is not quite 3m long as the half circle skirt bit took up the end. Cut one off each side so you have a selvage on each.
 Joy cutting 8 x 2 inch strips from the length.
 Joy is ruching the 2 inch strips freehand. This is so easy, much easier than gathering stitches, and amazingly even. Just get started, sew an inch or so into the middle of the strip with a longish stitch. Then bunch the fabric up towards the presser foot and let it sew through. Repeat over and again until it's all done...
 You get a wonderful double frill. We did this with all 8 strips, four each, just feeding the next one under the foot as the last one ran out.
 Now I am sewing the ruched 2 inch strip to the edge of my 16 inch strip. No finishing of edges required, this stuff doesn't fray. When you get to the end, just cut your 2 inch frill flush with the end of the big frill. Done!
Now the observant among those present will realise that you have to do all of this twice. That is, there were two 16 inch frills. Now as we were both working on it, we did one each, but the wise woman would join her 16 inch frills together BEFORE adding the 2 inch frill to the edge etc. Just sew them together with a 1/4 or 1/2 inch seam.
 Now sewing the 2 inch frill to the OTHER side of the 16 inch piece, only on the other side. This means that the other 2 inch frill is facing DOWN as I am sewing this one facing up. Capiche? It all makes sense soon. Again, trim when you get to the end. We ended up with about 6 inches left over. If you run out, just make a bit more 2 inch frill and add it. This is not an exact science! These 2 inch frills serve to really hold the bottom out.
 Now, Joy is doing the same thing to this big 16 inch frill as we did to the 2 inch ones - freehand gathering it down the centre. It turned out that the edge of the machine's tray was about 8 inches from the needle so she used it as a guide. There is still no measuring going on. Woot!
 The finished frill. Cute eh!
 
This may not be obvious from the photo but this is me sewing the big 16 inch frill down onto the bottom edge of the half circle, along the central gathering line. Do this so that the 2 inch frills both end up facing outward not inward.
I'm allowing about 1/2 inch of the half circle to overlap. No pinning, quarter marking etc. Trust the force, Luke!
 And tada!! Here we have stage one complete. I hope this photo makes our 29 inch half circle with 14 inches cut out of the top of it make mroe sense...Yes, we didn't have quite enough frill to go the distance but it's no big deal. Again, the easiness of this is to not measure and pin, but to just gather the heck out of everything and treat it like a trim!
We just cut the bit off at the end. Made it a bit shorter but still big enough.
Joy is marking the half circle at the 4 inch mark to add another frill. This second frill has only come about because I wanted to use up the leftover strip of fabric. I actually think that making this half circle twice and sewing them together at the top would be a near perfect petticoat. And so far, it's only taken us about 3 hours (that is, 1.5 hours with us both working on it)

This is me adding ribbon and lace to the bottom of the leftover fabric strip. I turned it up once, about a 1/4 inch, towards the front, and then I am sewing the lace and the ribbon over that turnup, together. You could sew the lace on and then the ribbon if the idea of doing both at once is a bit much. One last row of stitching along the top edge of the ribbon. It's an easy way to give something a nice, pretty and tidy edge. 
We gathered up this extra frill and sewed it to the line Joy had chalked. We left the first and last couple of inches of the frill free.
To finish it, sew the half circle skirt 'back seam' right sides together, about a half inch. Make sure you don't catch the frills into it. Then on the outside, overlap the frills and topstitch them down. You could sew them together but it's not necessary. Sorry, we tried to photograph this but with all that black, it looked like nothing. Definitely vlog potential this one.
The whole netty extravaganza was sewn onto an underslip with an elastic waist. Afterwards, Joy thought it would be good to make it separate so she could wear the underslip by itself with straight skirts. I think this is a great idea. In that case, you could just turn the top over to make an elastic case. Our finished length was 23 inches. That is 15 inches of half circle skirt, an 8 inch frill, minus seam allowances, plus the extra bit of 2 inch frill to compensate for it.
Showoff!
Petticoat under a full circle skirt. she won't wear this black petticoat with the white skirt as it makes it look grey, but it gives the general idea.
Great twirling potential!
A couple of pink roses for fun
And of course, our entertaining companion for the day, Madame Ornata, demonstrating why her name suits her so well!
OK, so this is what I learnt, and what we will do next time (making a white one).
1. Make half circles out of cotton. Why not? :) In that case I would serge the seams and edges, or use french seams and a narrow hem, since it would fray where the net one didn't. I'd also make two of them.
2. 3m of tulle or tricot 60 inches wide, would be even better - without cutting the half circle off the end, that extra bit would mean our frill was long enough. Without the second, bonus frill I added, 48 inches was enough width so a 96 inch wide tulle would be enough for two. Or just get 6 metres. These are not expensive fabrics :)
3. For a soft tulle or tricot, I might even make two rows of 2 inch frills, lay them one on the other and gather together, for extra body. It's this body that gives the fullness at the hemline.
4. If I did it this way, I would make a waistband on the straight grain out of the cotton and attach it to the two half circles.
5. Last alternative option -Make one of the cotton half circles longer - 23 inches instead f 15, finish the bottom edge with lace and ribbon like I described above, and sew the first 16 inch frill to it 8 inches in from the bottom edge. Then make the second one like described above. Why? Because really with these petticoats you want something nice between you and the tulle. Tulle is itchy, and can rip your tights. This does mean using 54 inch wide cotton unless you have a teency waist.
This all may sound complicated, but I promise that once you actually do it, you will find out how simple it is. If you understand pi geometry and how to size a half circle, it's easy to adapt to the right size and length for you :)