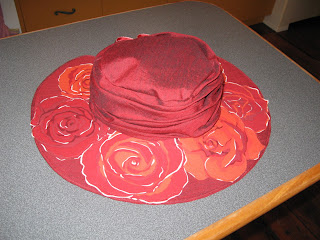
Me in my hat trying to take a photo. Not easy!
I think this hat looks very early 20th C. A few adjustments and it could be Edwardian, Georgian - all kinds of eras really. It's just about fabric and trim choices.
You need:
- A nice fabric that can take pressing - preferably a natural fibre. I used fine shot linen, about 3/4 yard.
- A fabric for fussy cutting the decorations. At least a fat quarter's worth.
- Very heavy vilene, about 1/2 yard, and a piece of lighter iron on vilene or other interfacing.
- Steam a seam - about 3/4 yard (visafix is not as good for this as it doesn't stay tacky)
- Matching threads, I used a variegated one
(Ignore the pinked edges, I was using a pinking blade on my cutter but a straight one would make more sense.) I cut the brim from the heavy vilene and two from the linen, at least a 1/2 inch bigger all round. I used the steam a seam to convert the vilene into double sided ironon,
and sandwiched it in between the two linen pieces. I pressed it all until the vilene was well and truly bonded. Trim the excess linen to be flush with the vilene underneath.Make a 2" wide bias strip of the fabric long enough to go around the whole brim, press in half longways, and sew both raw edges to the brim's edge with a scant 1/4" seam.
Now fold the strip up over the raw edges and sew it in place, making a neatly bound edge.
Now the decorations. I found lots of big flowery prints in my stash I could have used, and in the end I settled for the one on the far right.
The flowers are in rings already, so it's easy to see the potential. I roughly cut out several of the big roses and turned them into transfers with the steam a seam.
Here are the roses cut roughly. Once I knew how I wanted them, I trimmed the shapes neatly,
...and pressed them into position.
Using my free motion embroidery foot with the dog feed dropped, I 'drew' around each rose with the variegated thread, making sure the sewing was attractive as it shows on the other side of the brim also.
I sewed the brim to the crown and didn't even bother to sew tape over the seam, but it looks great anyway. See how the big soft foldy pleats around the crown give it an extra dimension, and they hide a multitude of sins too!
A bit of ribbon to adjust the open back and we're done.
This would have worked with a continuous brim hat also. The reason I made the bonnet style back is because I tend to twist my hair up and the resulting lump is hard to accommodate under a hat. This style of back accommodates the lump-(in fact that's probably why such hats and bonnets were in fashion whenever buns were). The only difference really is that before sewing the centre back seam of the crown, I trimmed a curved section off each side and bound it with bias. Then I just ran the seam down.Happy hat trick!


Love it love it love it. I will have to make one for next summer.. You are so inspirational Mrs C.
ReplyDeleteLoverly! It's so funny to see all the modern tricks you utilise - I'm such an old fashioned girl.
ReplyDeleteI just found this post of yours and I am really intrigued. I may just have to try to make a hat following your instructions...
ReplyDelete